Thursday, 14 May 2009

Microsoft Data Visualization Components on Windows 7

this post has moved to http://www.scottleckie.com/2009/05/microsoft-data-visualization-components-on-windows-7/

I’ve been playing around with the Data Visualization Components recently (looking to incorporate the TreeMap control with a SequioaView-a-like disk space analyser) but ran into problems getting the toolkit installed on Windows 7 RC1. Running the setup from the official page at http://research.microsoft.com/en-us/downloads/dda33e92-f0e8-4961-baaa-98160a006c27/default.aspx gets stuck looking for .Net Framework 1.1.4322;
image
Of course, being Windows 7, .Net 3.5 is already installed which should include .Net 1.1 but it looks like the Components installer is hopelessly confused. I couldn’t get the installer to believe we had something better than 1.1 already installed and I didn’t want to try and hack .Net 1.1 on top of Windows 7.
So, all I really needed were the “bunch of files” that come in the Component setup so I installed the package on an XP machine and copied them across to a folder on Windows 7, then referenced the DLL by hand.
I doubt there’s any .Net developers out there, running the RC of Windows 7, who doesn’t have a spare XP machine lying around too(!) but, just in case there is, I’ve placed the Zip here for your convenience. The licence states that it’s OK to distribute for non-commercial use and doesn’t say it needs to be in the original MSI format, so I don’t see a legal problem with this.

Sunday, 12 April 2009

“The breakpoint will not currently be hit. No symbols have been loaded for this document.” - VS2008

This post has been moved to http://www.scottleckie.com/2009/04/%e2%80%9cthe-breakpoint-will-not-currently-be-hit-no-symbols-have-been-loaded-for-this-document-%e2%80%9d-vs2008/

I’d been hacking around with Sharp Architecture (#Arch)a few months back but haven’t touched it recently. However, the release of 1.0 to coincide with the formal release of ASP.NET MVC 1.0 got me interested again, so I downloaded the latest and greatest to see what’s adoing…
There’s a great community around #Arch and it’s pretty easy to get your head around (assuming you’ve a basic grounding in MVC and NHibernate) and it even comes with a sample/tutorial app based on the ubiquitous NorthWind database. Now, being a cautious sort I figured I’d start by getting the NorthWind sample up and running, as this would prove I had all the dependencies installed and wired up.
All you (should) need to do is restore the standard NorthWind sample database, point the nhibernate.config at your local SQL Server, and you’re up and running. Except I wasn’t; all I was getting was “Internet Explorer cannot display the webpage”. OK; double check nhibernate.config and assemblies, turn up NHibernate logging, and stick a breakpoint on Global.asax.cs – that’ll pinpoint the error, right?
Wrong. The files are not being loaded, and my breakpoints have gone a funny shade of yellow, instead of red. Hovering over them displays the message “The breakpoint will not currently be hit. No symbols have been loaded for this document.” – Crikey! Much googling and assuming that the root cause must be astoundingly complex led me up several dead ends until I figured out that the cause was much simpler. Have a look at my (truncated) IE dialogue;
image
It’s talking to “localhost” which obviously(!) is my PC. But check out the zone display at the bottom; Internet! What’s it doing thinking my PC is in the Internet zone (with attendant security restrictions)? I tried adding localhost to the Intranet zone but this doesn’t appear to work either. In desperation, I thought “let’s ping it” even though I did not expect that to fail. Well, it didn’t fail, but look at this;
image
Looks ok. WAIT! what the heck is “::1”? Well, the more new-fangled amongst you will recognise this as the IPv6 version of localhost. Quite what IPv6 actually is, is beyond the scope of this article, but the main point is that 99.999% of the Internet and attendant applications expect IPv4 addresses, not IPv6. The IPv4 version of localhost should be the much more recognisable “127.0.0.1”.
So, I went back to my IE page and tried http://127.0.0.1:2386/ instead of the localhost version and, lo and behold;
image
It works! Final bit of the jigsaw is, where on earth is it getting ::1 from? Well, it was getting it from the hosts file, which lives in your <windows>\System32\Drivers\etc folder. Mine contained this;
image
So, I overwrote the ::1 entry (the IPv6 version of localhost) to be 127.0.0.1 (the IPv4 version);
image
Retried my web browser and all is now good with “localhost”;
image
Here’s my question, though; I didn’t change the Hosts file, and localhost certainly did work last time I was playing with #Arch, so what changed? Did a Microsoft security update overwrite the Hosts’ localhost entry?
Oh, one other thing. If you are using User Access Control (UAC) then access to the Hosts file will be restricted. The solution is to go find Notepad in your Start Menu and don’t left click on it; right-click it, and select “Run as administrator” then you will be able to save the Hosts file.

Auditing access to a file on Vista

This post has been moved to http://www.scottleckie.com/2009/04/auditing-access-to-a-file-on-vista/

Every so often, when I open Outlook, it tells me that my PST file was not closed properly and it’s being checked for errors. It seems from a spot of googling that this isn’t an Outlook problem as such, more that another app opened my PST and did not close it properly.
Task Manager or Anvir Task Manager (excellent app) shows that, whoever the culprit is, it’s not running the next time I start Outlook. My suspicions are firmly on Skype, especially as there are a ton of postings on it keeping the PST open, but I’ve checked the obvious settings and they don’t seem to be the culprit.
Right, I thought, let’s turn on file auditing and I can see which process accesses the PST file… Wow! What a faff this is, in Vista. Prior to Vista, auditing was really easy but now things have got way more “powerful” (according to Microsoft) or “difficult” (according to me). What is particularly galling is that you can even go and enable access audits on a specific file, and Vista won’t give you a hint that File System auditing isn’t even enabled! So, after a bit of digging around, this is how you audit access to a file;

Turn on File System auditing

You need to use a horrid app called AuditPol.Exe – the semantics of this are a bit too esoteric for me, but here’s what you need to enable file system auditing;
1: D:\Windows\system32> auditpol /set /subcategory:"file system" /success:enable /failure:enable


Note that the whole “auditpol” command is on one line.


Enable Auditing for a file


Now, go and right click the file you want to be audited, right click and go to properties. Go to the “Security” tab, and then click on “Advanced”. Now that you are in the Advanced dialogue go to the second tab, which should be called “Auditing”. You may have a button marked “Continue” if you are still using UAC – if so, click this and accept the next dialogue;


image


Finally, you get the auditing dialogue. Clock on “Add” and enable the auditing that you’re looking for. If you just want to know what / who opens the file, you just need “List folder / read data” auditing.


image


Very important; the “Name” entry defaults to your user ID, which means that it will only audit access by you. If you want to record access by anyone (and remember services may be running under the SYSTEM or other account) then you need to click the “Change” button and set it to audit access by “Everyone”.


Checking the event log for audit records


Last stage; you can check the Windows Event Log (via the “Administrative Tools” group or by running EventVwr.exe) to see audit results. Check the Windows Logs / Security log for event ID 4663, or the Task Category of “File System”;


image


Remember to disable when you fixed your problem


Best advice suggests that, once you’ve got to the bottom of your file access problems, you should disable auditing. To do this, follow these steps in reverse order; remove the audit options from the file, then disable auditing with AuditPol.ex;


1: D:\Windows\system32> auditpol /set /subcategory:"file system" /success:disable /failure:disable

Monday, 23 February 2009

Installing MythTV onto a 586, using a shell script

For background, see Compiling and installing MythTV on a VIA EPIA 800 (586) system

First, the basics. You need to install MythBuntu 8.10 onto your system first. The reason I stipulate this is that MythBuntu already has all the pre-requisite scaffolding and configuration to get MythTV up and running – we are just going to update the applications to be 586-friendly.

You can probably take the manual instructions (see separate post) and get MythTV compiled on anotehr distro but that will take a little experimentation.

So; you’ve got MythBuntu up and running. Now download the script from here, and make it runnable by typing;

  chmod 700 ./BuildMyth586.sh

Then execute the script by either;

  ./BuildMyth586.sh

or

  sudo ./BuildMyth586.sh

the latter may be the best bet as a number of tasks require to be run as root (make install for example), plus the entire process takes several hours on an 800Mhz CPU. Running the whole script via sudo means you only need to enter your password at the start.

You will see the following prompt;


This script will download, compile and install MythTV
onto a MythBuntu system. It has been checked on
^Ubuntu 8.10 but *may* work on other releases
Please ensure that you have backed up your system
before progressing.

You may be prompted for your password every so often. This
is passed to 'sudo' to perform operations requiring root
access.

Press Return to continue  and, all being well, you should see a succession of messages scrolling up the screen, similar to the following;


Getting Subversion (http://svn.mythtv.org/svn/branches/release-0-21-fixes/)

Getting Build Essentials (g++ build-essential linux-headers-2.6.27-7-generic)
Getting Myth Build Dependencies (libfreetype6 libqt3-mt-mysql libmp3lame0 libmp3lame-dev libXxf86vm-dev libxv-dev libfreetype6-dev qt3-dev-tools)
Getting Myth Plugins Build Dependencies (libmad0-dev libvorbis-dev libflac-dev libcdaudio-dev libcdparanoia0-dev libtag1-dev libtiff4-dev libexif-dev kdelibs4-dev)
Building Myth - this could take a loooong time...

If anything goes wrong you will see a message similar to this;

  Getting Subversion (http://svn.mythtv.org/svn/branches/release-0-21-fixes/)
Failed: Check /home/scott/MythBuild/_logsvn.out
scott@mythtv1:~$

Check the file that is mentioned (MythBuild/_logsvn.out in this example) for help in diagnosing the problem.

Eventually(!) the script should complete and you will see the following;


Complete - all looks good!

To start the back end, run /etc/init.d/mythtv-backend start
To run the front end, go to the Applications / Multimedia menu

Remember to be careful when updating applications - if you
update the MythTV applications this will probably restore the versions
that do not work on a 586. If you do this, then either rerun this
script or run make install from the following folders

    /home/scott/MythBuild/release-0-21-fixes/mythtv

    /home/scott/MythBuild/release-0-21-fixes/mythplugins

For information on running MythTV refer to the documentation at
www.mythtv.org or www.mythbuntu.org
scott@mythtv1:~$

If you intend this machine to be a backed, then start the backend services as detailed. Then you can run the frontend by going to the Applications / Multimedia menu.

I’m not going to go into any detail on configuring and using MythTV – the official sites do a much better job than I ever could.

Enjoy!

Sunday, 22 February 2009

Compiling and installing MythTV on a VIA EPIA 800 (586) system

I have four of these old 586-based 800Mhz EPIA boards lying around and I’ve been desperate to find a (funky) use for them. Eventually, I concluded that these would make great (if not super-powerful) media front-ends and, after a bit of R&D, I settled on MythTV as the app that was going to make this happen.

So I toyed around with MythTV on a faster test box and decided to install the excellent MythBuntu distro onto the EPIA and promptly got extremely confused. Whenever I started any of the Myth apps I was rewarded with… nothing! Starting the apps from the menus had zero effect so I started a shell and ran first the backend (mythbackend) and then the front end (mythfrontend) and got;

illegal instruction

Ah! Now we’re getting somewhere, I thought… A quick bit of Google and I’m sure I’ll get the answer! I got the answer, all right - the team behind MythTV stopped supporting the 586 a long time ago and this “Illegal Instruction” was telling the truth; MythTV was trying to run an instruction that my CPU did not have.

A quick (well, not that quick) shot at other distros including standard Ubuntu and MythDora showed that they were all using non-586 compatible builds.

Not to be outdone, and still desperate to find something to do with my EPIAs I decided to build my own 586-compatible version of MythTV on top of an existing MythBuntu system. I chose MythBuntu as the base because it already had all of the harnessing for a dedicated MythTV box – it was just missing code that would execute.

The following has all been tested on a MythBuntu 8.10 system which, unsurprisingly, is based on Ubuntu 8.10. It may work on other systems but you’re probably on your own there.

There are two routes you can follow to here;

  1. Download the script that will do everything for you, from here
  2. Run the commands one at a time

I’ve documented both approaches but the script is probably easier because;

  • It captures the output from each command (which can be veeeeeeeeeeeery long) into separate log files so you don’t get the display cluttered up
  • It checks that each command completes before moving on to the next
  • It’s just easier!

Related posts;

Installing from the scriptInstalling MythTV onto a 586, using a shell script
What the script doescoming soon
Installing by handcoming soon

Please let me know how you get on.

Wednesday, 4 February 2009

Top 10 reasons to use Windows Live Writer for writing your blog posts

Following on from my article on using Live Writer for code snippets, I found this excellent article on WebTechDaily that gives 10 reasons to use WLW for blog posts.

Monday, 2 February 2009

Posting code snippets on BlogSpot.com

One of the things that surprised me, when I started fiddling around with BlogSpot a couple of months back, is that there is no inherent capability to format source code in a posting.

I came across a few solutions (well, hacks…) and even posted on one solution last month. It was still a pretty yucky solution, though, involving hosting the code snippets at another site and then hacking the HTML to refer to it. It also seemed (although, this could have been my incompetence) to be very easy to screw up the rest of formatting in the posting.

Anyway – I found a better solution! Using Microsoft’s Windows Live Writer, I can compose my postings offline in a much friendlier front end. OK – lots of other tools can do this too, but the two things I love about Live Writer are;

  1. It has in-built support for BlogSpot, so I can display my blog right in the tool and then publish out to BlogSpot with one click
  2. It has support for “plugins”, including a number of source code formatters.

Now, don’t worry too much about the fact that this is a Microsoft tool. It seems perfectly happy with BlogSpot and, other than a requirement for the dotNet Framework 2.0 to be installed, does not seem hugely Microsoft-centric.

Installing Microsoft Windows Live Writer

To get this running, you need to wander over here and download and install the Live Installer. Now, just watch out that this installer gives you the option to install a whole load of apps – I’m not sure what all the others do (and don’t particularly care), but I was only interested in Writer. So I selected that, de-selected the rest and let it carry on.

Installing the Source Code plug-in (and other plug-ins!)

Next stage is to get the plug-in and install it. You can do this a number of ways;

  1. Go get it directly, from here
  2. Browse the Windows Live Writer Gallery here and pick your own Source Code formatter (there are quite a few)
  3. Within Writer, click on the Add a plug-in... tag way over on the right hand side, which actually takes you to the same place as option 2)

When you get to the gallery, you’ll see tons of optional plug-ins including Twitter Notify, Digg This, etc.

A warning if your Windows installation is not on Drive C:!

One point to note is that the Source Code Formatter plug-in expects to find Windows, and more importantly, “Program Files” on C:\. If, like me, your Windows install is on another drive (mine is on D:) then the plug-in files will “accidentally” end up in C:. The solution, is to find them in “C:\Program Files\Windows Live Writer\Plugins” and copy them to “D:\Program Files\Windows Live\Writer” – note also that the program folder in C:\ does not appear to be correct

Using the Source Code Formatter

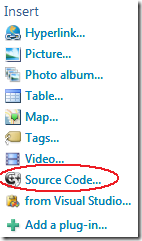
It’s easy to use. Once you’ve installed it, and restarted Writer, you should see a new entry in the “Insert” menu on the right hand side.

All you need to do is click on that Insert Source Code link, select the options you want and insert the code. See the screen shot below for an example.

image

image

Note that I’ve selected my favourite options, which are “Line Numbers”, “Enable Box”, “Alternating Lines” and “Enable Selection”. The outputed code is shown here;

  1: using System;
  2: using System.Collections.Generic;
  3: using System.Linq;
  4: using System.Text;
  5: using ProjectBase.Core;
  6: using ProjectBase.Core.PersistenceSupport;
  7: 
  8: namespace theCmdb.Core
  9: {
 10:     public class AuditType : PersistentObject
 11:     {
 12:         #region Declarations
 13:         private string _internalName = "";
 14:         private string _name = "";
 15:         private string _description = "";
 16:         private string _formatString = "{0}";
 17:         #endregion
 18: 
 19:         #region Constructors
 20:         protected AuditType()
 21:         {
 22:         }
 23: 
 24:         public AuditType(string name)
 25:         {
 26:             this._name = name;
 27:             this._internalName = name;
 28:         }
 29: 
 30:         public AuditType(string name, string description)
 31:         {
 32:             this._name = name;
 33:             this._internalName = name;
 34:             this._description = description;
 35:         }
 36:         #endregion
 37: 
 38:         #region Properties
 39:         /// <summary>
 40:         /// Name of this Audit type
 41:         /// </summary>
 42:         public virtual string Name
 43:         {
 44:             get
 45:             {
 46:                 return _name;
 47:             }
 48:             set
 49:             {
 50:                 _name = value;
 51:             }
 52:         }
 53: 
 54:         /// <summary>
 55:         /// Internal name of this system type
 56:         /// </summary>
 57:         [DomainSignature]
 58:         public virtual string InternalName
 59:         {
 60:             get
 61:             {
 62:                 return _internalName;
 63:             }
 64:             set
 65:             {
 66:                 _internalName = value;
 67:             }
 68:         }
 69: 
 70: 
 71:         /// <summary>
 72:         /// Audit type description
 73:         /// </summary>
 74:         public virtual string Description
 75:         {
 76:             get
 77:             {
 78:                 return _description;
 79:             }
 80:             set
 81:             {
 82:                 _description = value;
 83:             }
 84:         }
 85: 
 86:         /// <summary>
 87:         /// The format string used to write the audit message
 88:         /// </summary>
 89:         public virtual string FormatString
 90:         {
 91:             get
 92:             {
 93:                 return _formatString;
 94:             }
 95:             set
 96:             {
 97:                 _formatString = value;
 98:             }
 99:         }
100:         #endregion
101: 
102:         #region Overrides
103:         public override string ToString()
104:         {
105:             return InternalName;
106:         }
107:         #endregion
108: 
109:     }
110: }


Posting from Writer


Posting to BlogSpot is very easy (assuming you’ve already logged in to your Blog from within Writer). Just hit the Publish button and you’re almost there. An oddity, is that I would have assumed that “Publish” meant, well, publish. Instead it seems to mean “Publish to draft” so you still need to go to BlogSpot and commit your posting. A small price for a very nice tool. Update; it does publish when it was created entirely within Writer – if you are editing a Post that was originally created within BlogSpot then it’s only a draft…


Credits


That’s about it! Finally, I’d like to direct you to Amer Gerzic’s site – he is the creator of this wonderful plug-in.